Sunday, June 30, 2013

Sunday Nail Art-Newspaper nails

Hi all! How's everyone's weekend been? I haven't been up to much really, watching Firefly and Angel. I finished Firefly this weekend and watched Serenity(for the second time). My fave character dies :( Don't you hate when that happens? You're all like GRRRRRRR TV I HATE YOU and you're all mad but at the same time you're crying cuz you're favorite character just got IMPALED BY A GORAM REAVER HARPOON. 
So anyway, today I wasn't feeling terribly inspirational or artistic. I was going to do one design but it failed miserably and sapped out all my creativity for the day. So I reverted to my favorite back up manicure ever, newspaper nails! 
I can't even explain how much I love newspaper nails! I hadn't done them in a couple of years and I thought it would be fun to do them again. And they're SO easy!
 The base is OPI-My Boyfriend Scales Walls. I did accent nails by using characters from the comics page :P You can see them all at the end of the post. 
I kind of failed a little bit on my left hand. I don't know why but I just couldn't place the newspaper properly!
To do these I painted on my base color, then some quick dry topcoat. It's really important that the nails are DRY before doing the newspaper part! Then I clipped small sections of newspaper, dipped them in Isopropyl Rubbing alcohol and pressed them onto the nail. I held them there for about 10-15 seconds, and rubbed the surface of the nail so they would transfer evenly. If you're curious check out this awesome tutorial:http://www.youtube.com/watch?v=2kcdt4_5Ncc

Is it weird that I really love the smell of rubbing alcohol? 


The newspaper print does tend to get all around you're other nails, and it's kind of a pain in the butt to remove. But all in all newspaper nails are so PERFECT for any occasion and are super easy to do!
Here are my ring fingers and thumbs that I did accent nails on. I used little characters from the comics section for them! I didn't really show them in the other pictures so I thought I would put them here!
That's it guys! Thanks for reading, and, advice, don't watch Serenity unless you're in for a cryfest. Bye guys! 

Thursday, June 27, 2013

Some Impromptu Nail Art

Hello everybody! Today I just have some really quick nail art that I did yesterday. I had some colors out for swatching and they all looked really cool together, so I thought I would put them in a simple design. These were really quick and easy, but look really nice!
I was just going for something relatively simple, just so my nails wouldn't have to be all bare and boring. I don't do nail designs with tips too often, but I think these look cool!
The base is OPI-Did You 'Ear About Van Gogh? I love that name so much it cracks me up! The accent nails with the gold glitter are China Glaze-Blonde Bombshell. Another giggly name :P The blue tips are done in Essie-Butler Please, and the green ones are Revlon-Minted.
These nails were super quick, I just used the brush to get the V design! While simple, i still think these look nice and classy :)
I think this is a great nail design that anyone could try. It's so easy! 
Anyway that's all for today. All the polishes I used are ones that I had out for swatching, so you'll be seeing all of these at a later date. Thanks for reading, and I'll see you next time!

Wednesday, June 26, 2013

Nail Art Spam!

Hey so I found these pictures of some nail art I had done a while ago. This was before I started blogging, but I thought they would be cool to share!
I call these my "stained glass" manicure.
I remember when I first did these I got a ton of compliments and "OMG how did you do that?" They were actually really easy, I just used my ever trusty striping tape to block off sections, then used a dotting tool with different colors! Easy!
I also did these, which I definitely remember seeing from somewhere else first and copying, but i seriously can't remember where. These are supposed to looks like little flower necklaces!

The last pictures I have are of these: which is a manicure I did when my friend told me that my nails "weren't colorful enough" and that I should use "more colors"
I used the fan brush method and three different colors on each nail to do the striping. I also have glitter on my pinky (?).
And please disregard all the blue pen ink on my nails. I always seem to get ink everywhere, and I have no idea how!
That's all for today guys! I'll have some new swatches up later this week, thanks for reading!

Tuesday, June 25, 2013

Ciate-Apples and Custard

Hello everyone! How is everyone's week going? I've been lounging around the house, enjoying my free time...watching Firefly till my head explodes from the sexiness of Mal Reynolds (Nathan Fillion). So sad there are only 14 episodes :( I'm going to have to keep watching these episodes over and over again until I get enough...
So today's color is Ciate-Apples and Custard. I picked this up when I was in London several months ago. It's a UK brand, so shipping to the US is MONSTROUS! I got lucky when I saw them in this department store my mom and I were in. They had quite a few colors there, but I was kind of on a budget and only got one, the only that really called out to me. Of course, it was green (I am such a sucker for green. I have more green polishes in my collection than any other color).

Apples and Custard is a lovely spring green, but not the same as Illamasqua-Nomad, which is a bit lighter and brighter. Apples and Custard is a little grey toned, though less so in real life than in these pictures. These pictures are showing it a little darker than they really are.
And I just love those bottles! That's one of the main reasons I wanted a Ciate polish so bad, just look at that awesome bottle shape! And the little bow... *dies* it's so cute!
Unfortunately the formula on this was a little less than ideal. It was REALLY streaky and kind of lumpy, which is weird because I've worn this polish before and don't remember it being so lumpy. Maybe I just applied it bad this time around, but I'm wearing 4 (!) coats in these pictures, and it needed all 4 coats to be even and smooth. But I think some of that was my fault, I was kind of rushing :-/, and if I applied it more carefully I could probably get away with 3 or 2 coats. It would be a pity of the formula on this was really that bad, because in the US these retail for about $15. It's a high end brand man! 
You can buy Ciate polishes in certain Sephora stores, and on their website.
Well that's all for today guys! I have to go board the Serenity and fly around space now...yay!
Teehee Malcolm Reynolds
Oh and uh...my new catchphrase

Sunday, June 23, 2013

Sunday Nail Art-A Tolkien Worthy Manicure!

Hello my fellow hobbits, elves, dwarves, and wizards! (Sorry orcs, and nazgul you're not invited no one likes you cough cough witch king of Angmar I'm talking to you no one likes people who think they can just go around stabbing others with their morgul blade. Also you got beat by a girl). Wow do we really need any MORE proof of what a nerd I am? I'm in such a Lord of the Rings/Tolkien mood right now and you'll see why in a sec. I'm super excited to show all you middle earth beings my manicure today! This manicure is actually kind of sad too, because it's dedicated to my friend who's moving :( to San Francisco in a couple weeks. We had gone to see The Hobbit together (AMAZING btw) and I got her the Hobbit Pocket Edition for Christmas. So, without further ado (I love that phrase :P) my nails:
If you haven't already guessed, these were inspired by:
Photo courtesy of www.thinkgeek.com
The pocket edition of The Hobbit! Yay! 
Let me just say that these nails were actually a lot of fun to do. I've never really done a nail design based on pictures before, I usually do patterns, and when I do try pictures they normall fail horribly. So I'm super proud of these nails and of the fact that I didn't give up halfway through. 
Hopefully you can see what part of the book inspired each nail. I was going to do some of that dwarvish writing along the border of the cover on one of the nails, but decided not to. I focused more on the mountains, I guess because I consider the mountains the more important part of the cover/story. I mean Erebor was a mountain right? Plus the mountains take up most of the cover anyway. 
Here's an awkward picture of what my thumb looks like. I'm never good at hand poses with thumbs :-/
Teehee the birds all look like little mustaches :{
Here are all the colors I used:
And yes those are my rubber duckies in the background :) I take all these pictures in my bathroom ok?! The lighting is good in there.
From left to right the polishes are:
Unnamed black creme
Essie-Maximillian Strasse Her (weird name) this is the base polish on my index finger
OPI-My Boyfriend Scales Walls this is the white base for all the nails
Zoya-Evvie
Kleancolor-White
Sinful Colors-Envy this is the green base color on my pinkies
Missha-Grey
Venique-Run Shoes Run!
 I did this design on both my hands. At first I wasn't going to, because I did my right hand first and it took such a long time, and I didn't think it looked all that good, so I decided I wouldn't do my left hand. But then I applied top coat, which always makes everything better, and it looked pretty cool, so I decided to make my manicure complete and do my left hand. I guess this is a testament to how much free time I have :P
These nails all have two coats of top coat.
I'm not going to go into too much detail about how I did each nails. For the most part I used my little detailing brush for the mountains, the birds, and the sun. I used a fan brush for the stripy sky on my middle fingers and thumbs, and a dotting tool for the trees. 
And this manicure also officially taught me that I fail with striping brushes. I tried to use a striping brush at first but it was like nope Nova I hate you, so I've basically given up on striping brushes all-together. The brush I used in this manicure was a little detailing brush:
I'd never really used it to do nail art before, but thought I would give it a try, and I'm really glad I did, because I love it! It's so much better for me than a striping brush. I think this will be my go to brush for nail art from now on. Yay!
So here's a final comparison between the manicure and the inspiration:
I don't think it's a perfect match, but what do you guys think? Comment below! 
Overall I'm pretty proud of myself for even trying this manicure in the first place! They definitely came out better than expected. I think the cover on this book is really cool, and the nail version could never be as detailed. But I still think it's a Tolkien worthy manicure! I might have to do something similar to this for the premier of The Hobbit pt 2 The Desolation of Smaug. Yay excited!
And look, it's Bilbo Baggins!
Thanks for reading guys, and I'll see you next time! 

Saturday, June 22, 2013

Nail's Inc-Sugar House Lane

Hello fellow muggles and lovers of nail polish! Hope I'm not offending any wizards/witches reading this, because that would be SOOO COOL!! If you guys know of any witches who love nail polish please tell me! Cuz that would be AWESOME!
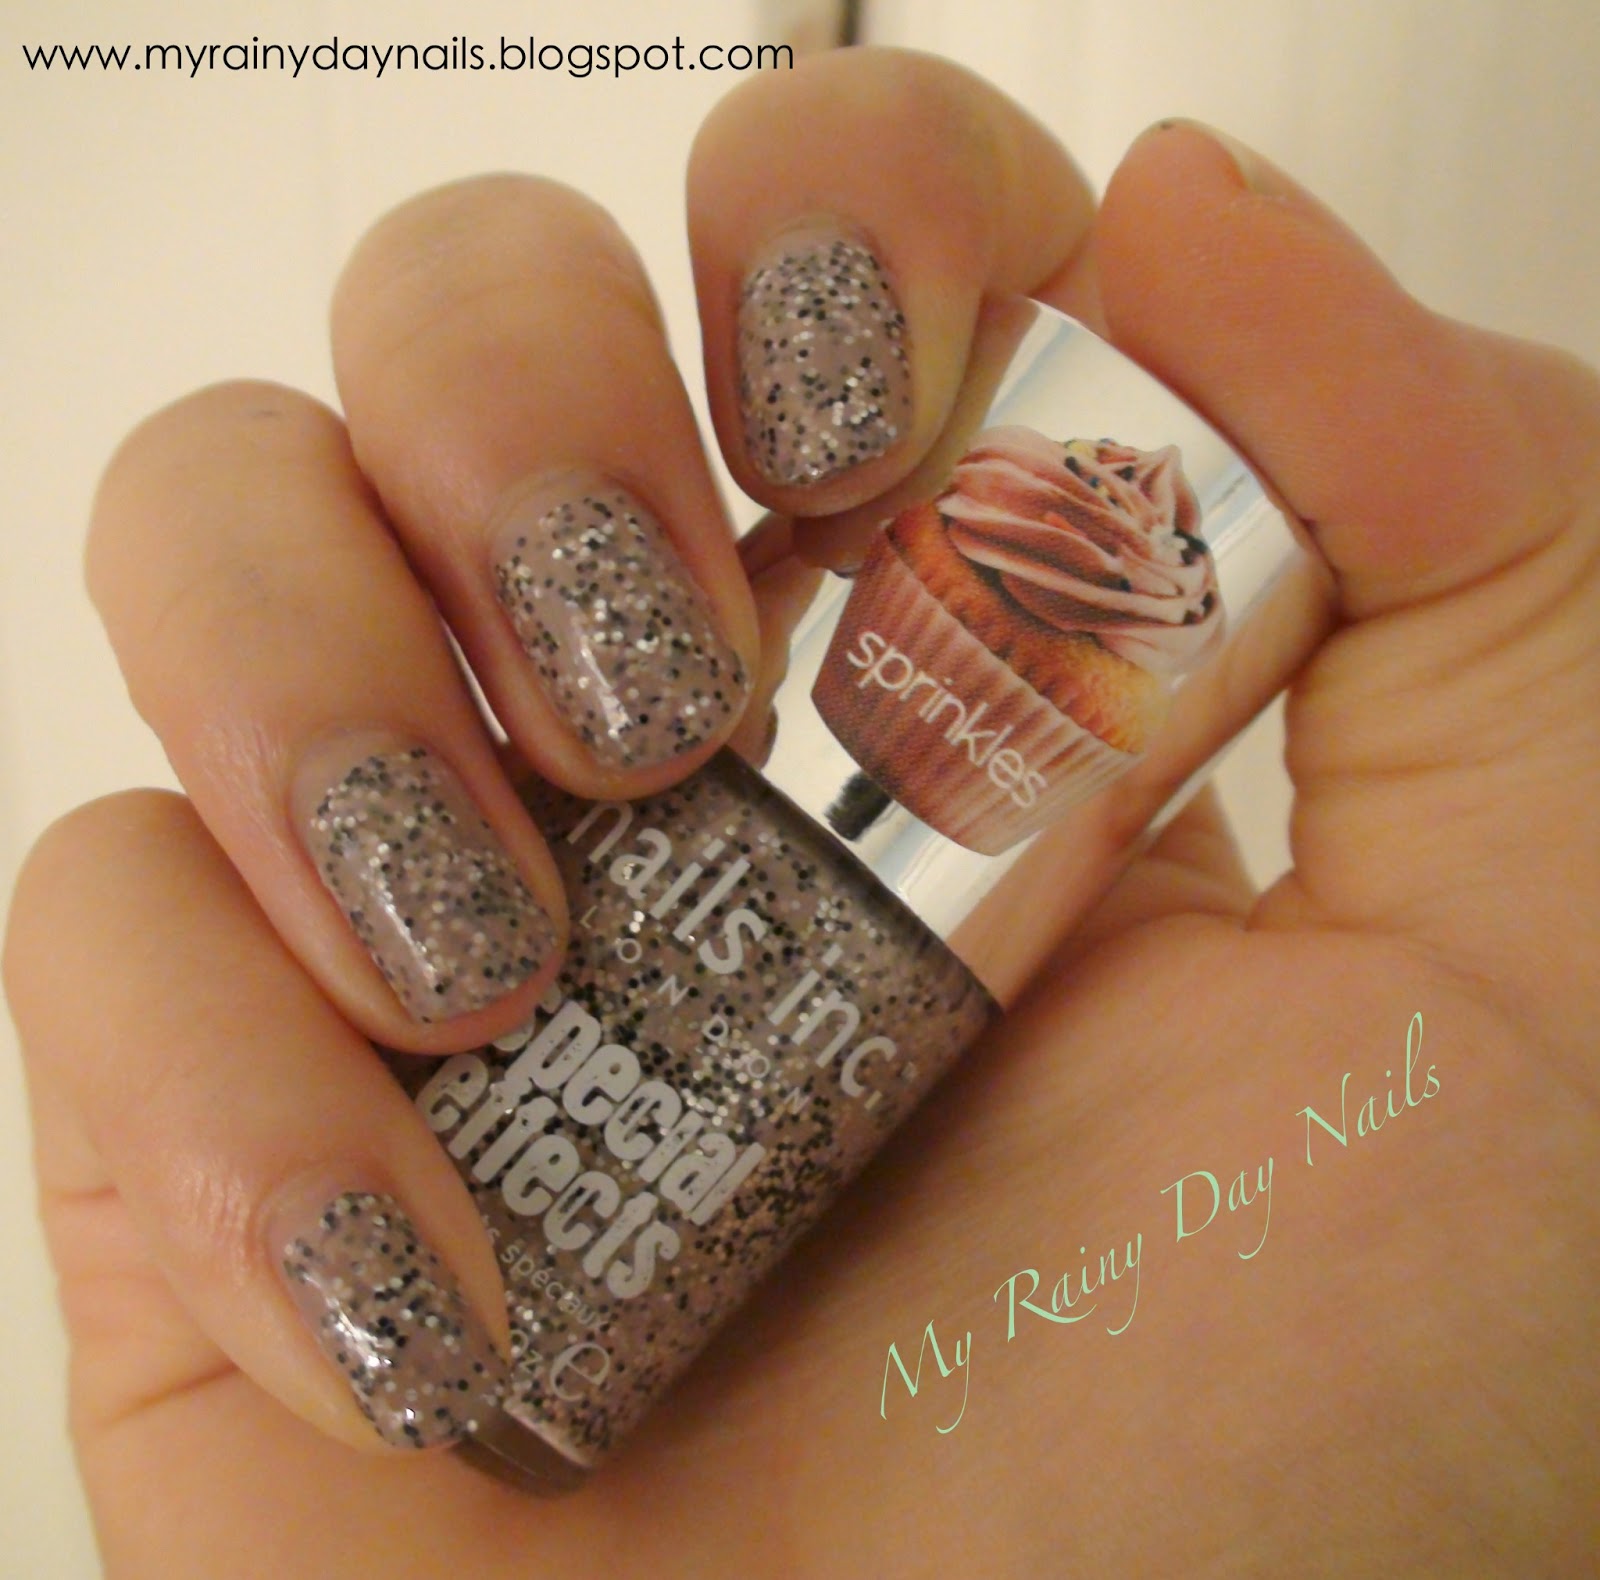
Anyway today's polish is a nice fun glitter I picked up a while ago. Nails Inc-Sugar House Lane. It's from their sprinkles collection, which consisted of 4 polishes with different colored glitter in a colored base. It was supposed to look like cupcake sprinkles, and I think they're really cute. Only Sugar House Lane really called out to me, and you'll see why in a sec, but all the others are pretty cute too!
SHL is black, white, and silver small hex glitter in a nude brown base. *Nude!* I love nude/tans, so this is the only color in the collection that I was really tempted to buy. 
The glitter in this does tend to sink to the bottom, so I gave mine a good shake before using it. 
The formula on this was flawless. With all that glitter I expected it to be thick, but in fact it was actually kind of thin! I used 2 coats plus one coat of top coat. I am really in love with this formula, why can't all jelly base glitters be like this?! (cough cough urban outfitters pluto I'm talking to you).
The only downside to this polish was that removal was a PAIN IN THE ASS. It wasn't that it was gritty or anything, it was a pretty smooth removal, it's just that you have to use a different cotton ball for EVERY FINGER or the glitter from the previous nails would get ALL OVER YOUR HANDS. I didn't figure that out until I was done removing, and by that time I had glitter stuck to all my fingers, even on my left hand which I didn't even swatch! 
Aside from the removal, this polish is pretty awesome and I'm kind of in love with it! I'm going to have to do some sort of nail design with it. Already brainstorming ideas...
Nail's inc polishes can be found in Sephora for $9.50, and you can also find it in department stores like Selfridges in the UK, but I only know that because I saw them there when I went to London.
That's it for today's post, and I'll see you all tomorrow! Enjoy your weekend!

Friday, June 21, 2013

Julep-Eloise

Hello everyone! Happy first day of summer! Hope everyone is enjoying the nice weather! Today's post will be a short one cuz I gotta run to a birthday party after this. The polish I'll be showing you all today is Julep-Eloise. This is a nice blue-grey creme. It's a very soft looking shade, but dark at the same time. I love colors like this.
These photos are showing the color a little darker than in real life. While the polish does apply a little darker than bottle color, it's not as dark as these pictures. It's hard to see the grey undertones in these pictures, but it's definitely there!
 The formula on this was a little streakier than expected, but not too bad. I used 2 coats for these pictures. For most polishes I wouldn't be upset about having to use 2 coats, but seeing as Julep bottles are FREAKING TINY(see picture below) and are als FREAKING EXPENSIVE, I kinda hoped it would only require one coat. I was sort of hesitant about swatching my Juleps, because I didn't want to waste them! They dry pretty fast, and also nice and shiny. These pictures do not have top coat.
The bottle color in this picture is closer to what the polish looks like on the nail. It's really pretty! I love smoky grey looking colors.
Julep costs $14 (!!) each(!!!!!) for a bottle that only has .27 fl oz, which is about half of a normal bottle (!!!!!) I did get all my Juleps on a sale though, when I first signed up on their website. It's kind of complicated, but I got 4 bottles for about $10 (!) and then 2 more later. But I'm not going back to that site and paying $14 for a teeny tiny bottle. 
You can find Juleps on their website, and at places like Sephora.
That's it for today's post have a good rest of the day!

Thursday, June 20, 2013

OPI-Honey Ryder

Hello people of middle earth! Today was my last day of school!!!!!!!!!!!!!!!!!!!!!!!! Hello summer! Summer=sleep, nail polish, nail art, Buffy, Firefly, band camp, sock monkeys, bracelets, and any other fun crafts that I find myself interested in! So excited!!
Today's polish is one of those new textured polishes that is SWEEPING the nail polish land. I'm pretty sure OPI, China Glaze, Zoya, Orly, and at least on other brand that I can't remember right now has a line of textured polishes. Essie is the only big brand I can think of that hasn't caught on yet. We'll just have to wait and see...
This polish is from OPI's bond girls collection (and it's based on the one bond girl in the collection that I actually know!) OPI-Honey Ryder.

I picked up Honey Ryder at this years spring fling, along with Solitaire, so I'll be posting that sometime soon. Those are the only two textured polishes I own, and I really want to get my hands on some more, maybe some more colorful ones, because they are AWESOME!
Honey Ryder is a gold textures polish, with lot's of gold sparkle! It's awesome. It dries all matte and gritty, although it is smoother than I expected. I guess it can't be too gritty otherwise it would be catching on things. That would be annoying
The formula was beautiful, it applied just like a regular polish. It dried nice and fast and only needed two coats. You're (obviously) not supposed to wear a top coat with these sorts of polishes, so I don't know how long it lasts. I was going to take top coat pictures so you guys could see how HR looked with top coat, all glossy and smooth and stuff. But I forgot :-/
OPI polishes tend to cost around the $8 mark, and you can find them in drug/beauty stores like CVS, Walgreens, Harmon's, etc.


The original Honey Ryder :P She's from the very first James Bond movie, Dr.No. The really old James Bond movies with Sean Connery. Yeah. That old. I know nobody remembers those early movies but they weren't half bad! And I really liked Honey Ryder too. Before she got all evil. :(
That's all for today everyone! 

Wednesday, June 19, 2013

Essie-Saturday Disco Fever

Hi! Tomorrow's the last day of school yay! There was like NO ONE in school today, it was weird! I'm just going tomorrow because I want to see my english final. And then no more school! 
So today I actually have a recent polish to show you, not one that I picked up like two years ago. It's Essie-Saturday Disco Fever and it's from their new neons collection or something. Now let me just get a little disclaimer thing here, THIS POLISH IS NOT ORANGE!!!!! If you check my Sunday Nail Art post from last Sunday with the zig zags, that pinkish red color, that's what SDF actually looks like. No matter what I did, this polish photographed orange. It drives me crazy.

UGHGHGHGH I know it looks SO ORANGE BUT IT'S NOT!!! I swear that it's definitely more of a red pink almost color. I would never buy an orange polish, I hate orange!
And yes, I know, I thought of this too...
Great movie. Btw.
SDF without top coat. Dries satin-matte.
Even the bottle shot looks orange. Grrr stupid polish and camera, why you no cooperate!!
This was a neon, so it dried a little satin matte(2nd picture). I'm wearing one coat of top coat in all the other pictures. The formula was a lot better than I had expected, not nearly as sheer as I thought it would be. I'm wearing only 2 coats in these pictures over a tinted base coat. You can see a little bit of nail line, but it's good enough for me. 
I like how this polish looks all juicy and jelly-like. It's also a really pretty color, remember, THIS IS NOT ORANGE. It's a reddish pink. Stupid camera.
Essie polishes cost around $7 and can be found in most drug stores.
Anyway, I have the whole afternoon ahead of me, and I promised my friend I would watch the season 2 finale of Sherlock, so...I'll see y'all later!
And yes that is Martin Freeman aka the hobbit :P