My New Year's Eve Mani!
Hello lovelies and happy new year's eve! I have my final mani of 2013 to show you all! It's my new year's mani of course! For about a second i considered doing a simple black and gold design. But then I was like who am I kidding, it's new year's eve, time to be sparkly and colorful and BAM! So that's what my nails are today.
Please excuse the million pictures in this post. But these took me a long time, so the longer time it takes, the more pictures I get to include :D
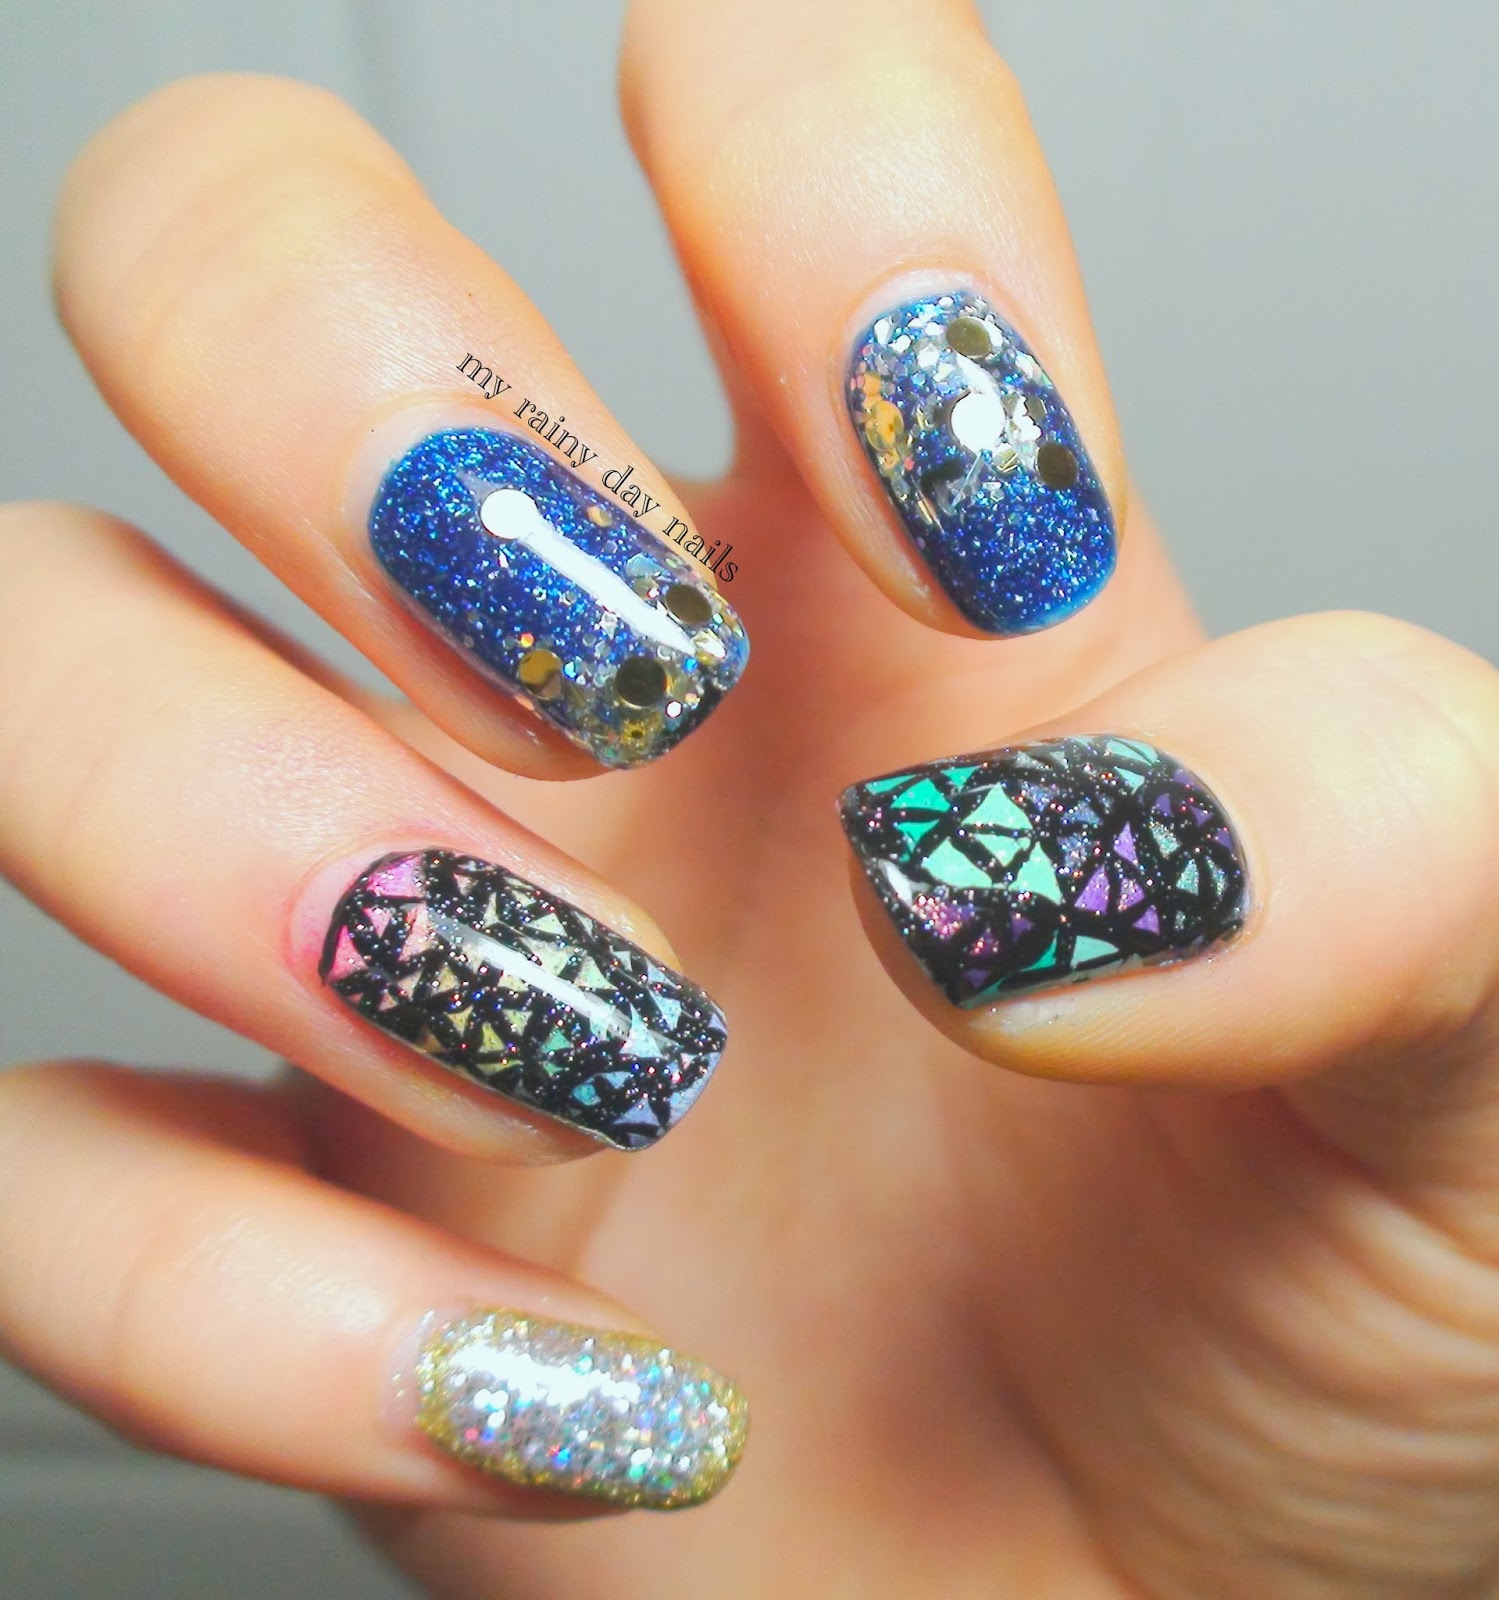
So there is just so much going on in this mani, I've got framed nails, glitter gradients, loose glitter, polish gradients, and of course my nail art.
My patterned accent nails were inspired by what is, at least for me, the biggest symbol of New Year's, the ball in Time's Square! I love that ball, and I've been watching it drop every new year's since I could count down from 10. Personally, I just love how colorful and bright it is. So beautiful!
I did 4 ball accent nails (2 on my right 2 on my left). Each one is different, so I included left hand pics in this post just to show you guys!
I honestly love those accents so much. I used so many colors for each nail they're all so....colorful. Sorry I'm not eloquent today lol
The only nail that's different here is the right ring finger.
For the right ring I did a rainbow gradient using a make-up sponge. I used my cut down striper brush to make the triangles on top.
To do the triangles I drew in large triangles first. Then I connected the midpoint of each side to make a smaller triangle inside the big one. This divides the triangle into 4 small triangles. Did that make any sense? Anyway it's really not as hard as it looks.
For the rest of the nails I used a white base, except for the left thumb, which has a base of OPI-My Vampire is Buff. Then I drew in the "Large" triangles with black and filled them in with the colors. When that was dry I went over my previous lines to crisp them up, and then went in again to make the smaller triangles inside the larger ones. Lol I'm sorry if this is confusing you :/ I'll make a separate tutorial post for you guys later that will make it clearer! Promise!
I made this so you can see all the colors used for each ball accent nail. If you're curious about any just leave me a comment!
All the accent nails were finished with one coat of China Glaze-Fairy Dust, to make them extra sparkly!
*whew* Ok if you're still here reading, I commend you! Onwards to the other fingers!
On each pinky I used China Glaze-Nova, this super sparkly silver holographic glitter polish. Then I used a wider striping brush and China Glaze-Blonde Bombshell to frame it. It doesn't show up that great, but I think it adds a nice touch of color!
On the other 2 nails I used 2 coats of Zoya-Dream as the base. It's this amazing blue jelly with flecks of silver holographic sparkle *love* I then made a glitter gradient from the tip and from the cuticle using the appropriately named Midnight Kiss by Urban Outfitters.
The gradients felt just a little bit plain, so I picked up my orange stick and gold circle glitter, and added a few pieces here and there to spice it up. Added like a million coats of topcoat to everything, and I was done!
Geez thanks for sticking through that post guys! So tell me what you all think of these! I'm not sure I even want to take these off ever, they're so cool!
As always thank you for reading everybody! I hope you all have a wonderful new year's eve, I'll see you all in 2014!
~Nova


No comments:
Post a Comment